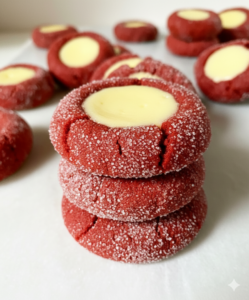
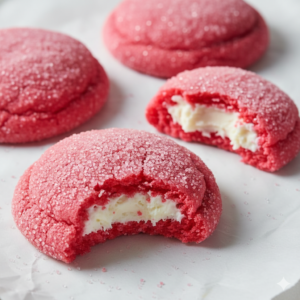
These Red Velvet Cheesecake Thumbprints are the ultimate sophisticated treat. I’ve found that the secret to the perfect red velvet flavor is the hint of vinegar and cocoa, which creates that classic “tangled” taste. These cookies are a stunning deep red, rolled in sparkling sugar, and filled with a velvety cheesecake center. They are perfect for holiday platters, Valentine’s Day, or any time you want a dessert that looks like it came straight from a high-end bakery.

Prep Time: 25 min | Cook Time: 20 min | Total Time: 3 hours 45 min (includes chilling) | Yield: 3.5 Dozen
Key Ingredients
Red Velvet Cookie Dough
- 2 3/4 cups All-purpose Flour: The structural base.
- 1/2 cup Unsweetened Cocoa Powder: Use natural cocoa for the best chemical reaction with the vinegar.
- 1/2 cup Butter & 4 oz Cream Cheese: Both softened; the cream cheese makes the dough extra tender.
- 1 cup Granulated Sugar: For the perfect sweetness.
- 1 Egg + 1 Egg Yolk: The extra yolk adds richness.
- 1 1/2 tsp White Vinegar: Essential for the classic red velvet tang.
- 2 tsp Vanilla Extract & 1 tsp Red Gel Food Coloring: For flavor and that iconic color.
- 1 tsp Baking Powder & 1/2 tsp Salt: For lift and balance.
Cheesecake Filling & Rolling
- 4 oz Cream Cheese: Softened brick-style.
- 2 tbsp Granulated Sugar: Just enough to sweeten the center.
- 1 Egg Yolk: Helps the cheesecake set during baking.
- 1/2 tsp Vanilla Extract: For a classic cream filling flavor.
- 1/4 cup Granulated Sugar: For rolling the dough balls.
Step-by-Step Instructions
- Mix Dry Ingredients: Whisk together flour, cocoa powder, baking powder, and salt. Set aside.
- Cream the Base: Beat butter and 4 oz cream cheese until light and fluffy (about 2 minutes). Mix in sugar, then add the egg, egg yolk, vinegar, vanilla, and red gel coloring.
- Combine: Gradually add the dry ingredients in three installments, mixing until a vibrant red dough forms. Wrap the dough in plastic and chill for at least 3 hours.
- Prepare Filling: Beat the remaining 4 oz cream cheese until fluffy. Mix in the sugar, egg yolk, and vanilla. Transfer to a piping bag or a ziptop bag with the corner snipped off.
- Roll and Indent: Preheat oven to 300°F. Roll tablespoon-sized portions of dough into balls, coat in sugar, and place 2 inches apart on a lined tray. Use a 1/2 tsp measuring spoon to press a “well” into each.
- First Bake: Bake for 10 minutes.
- Fill: Remove from oven. Re-press the centers with a 1 tsp measuring spoon if they puffed up. Pipe the cheesecake filling into each well. Tap the pan once to release air bubbles.
- Final Bake: Return to the oven for another 10 minutes until the cheesecake is set.
- Set and Chill: Cool on the pan for 10 minutes, then move to a rack. Refrigerate for at least 45 minutes before serving to allow the cheesecake to firm up.
Serving Suggestions
- Holiday Platter: Pair these with white chocolate-covered pretzels for a beautiful red-and-white theme.
- Coffee Break: The tangy cheesecake center makes these a perfect companion for a bold dark roast coffee.
- Gift Tins: These are sturdy enough to be gifted! Just place parchment paper between layers to keep the sugar and cheesecake intact.
Storage & Make-Ahead Tips
- Refrigeration: Because of the cheesecake filling, these must be refrigerated. Store in an airtight container for up to 5 days.
- Make-Ahead: You can make the dough up to 3 days in advance.
- Note on Freezing: These can be frozen for up to 2 months, but the texture of the cheesecake center may change slightly upon thawing.
Tips & Tricks
- Fix the Cracks: If the dough cracks when you press the “well,” simply use your fingers to pinch the edges back together. Chilling the dough properly reduces cracking!
- Gel vs. Liquid: Always use gel food coloring. Liquid coloring can alter the dough’s consistency and won’t provide as deep a red color.
- Room Temp Ingredients: Ensure your cream cheese is truly softened so the filling is smooth and free of lumps.
Common Mistakes to Avoid
- Hot Pans: Never place raw dough on a hot cookie sheet between batches. Let the sheets cool completely to prevent the cookies from spreading too thin.
- Skipping the Final Chill: Red velvet and cheesecake both taste better cold. The final 45-minute chill is what gives the cookie its signature texture.
Chef’s Advice
- The Vinegar Secret: Don’t skip the vinegar! It reacts with the natural cocoa powder to help preserve the red color and provides the authentic “velvet” crumb.
- No Piping Bag? A ziptop sandwich bag with a small hole snipped in the corner works just as well for filling the centers cleanly.
History and Cultural Significance
Red Velvet began as a “Velvet Cake” in the Victorian era, where “velvet” described the soft, fine crumb.1 During the Great Depression, Adams Extract company popularized the use of red food coloring to sell more extracts.2 Combining this iconic Southern flavor with the classic European thumbprint cookie creates a modern fusion that is a staple of American holiday baking.+1
Final Thoughts
These cookies are the perfect balance of cocoa-rich dough and tangy, creamy filling. They take a little patience with the chilling time, but the beautiful result is more than worth the wait. Happy baking!
Nutrition Information Table + Disclaimer
| Serving Size | Calories | Protein | Carbs | Fat | Fiber | Sugar |
| 1 cookie | 115 | 2g | 14g | 6g | <1g | 8g |
Disclaimer: Nutrition information is estimated using standard online calculation tools and may vary based on ingredients and preparation methods. For accurate dietary advice, consult a qualified nutrition professional.