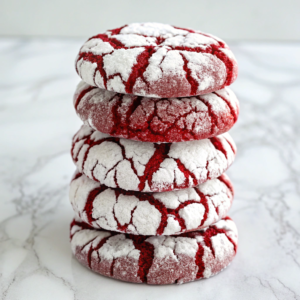
If you’re looking for a show-stopping cookie that tastes as incredible as it looks, these Red Velvet Crinkle Cookies are your answer. Combining the beloved flavors of classic red velvet cake with the irresistible texture of traditional crinkle cookies, these treats are soft, chewy, and absolutely stunning on any dessert table. The deep crimson dough rolled in snowy powdered sugar creates that signature crackled appearance that makes crinkle cookies so visually captivating. From Emma’s Cake Studio, this recipe has become a festive favorite for good reason—they’re perfect for Christmas cookie exchanges, holiday gift boxes, or simply enjoying with hot cocoa on a December evening. The subtle cocoa flavor paired with the striking red and white contrast makes these cookies an instant crowd-pleaser that’s surprisingly easy to make.

Prep Time: 15 min | Cook Time: 12 min | Chilling Time: 30 min | Total Time: 57 min
Key Ingredients
For the Cookie Dough:
- 1½ cups all-purpose flour
- ½ cup unsweetened cocoa powder
- 1 teaspoon baking powder
- ¼ teaspoon salt
- ½ cup unsalted butter, softened
- 1 cup granulated sugar
- 2 large eggs
- 1 teaspoon vanilla extract
- 1 tablespoon red food coloring (gel food coloring works best for vibrant color)
For Coating:
- ½ cup powdered sugar (confectioners’ sugar)
Substitution Notes: Gel food coloring produces the most vibrant red without making the dough too wet. If using liquid food coloring, you may need slightly more. Dutch-process cocoa powder will create a darker, richer cookie, while natural cocoa powder yields a lighter result.
Step-by-Step Instructions
1. Preheat the Oven Set your oven to 350°F (175°C). Line two baking sheets with parchment paper or silicone baking mats. This prevents sticking and ensures even baking. Set aside while you prepare the dough.
2. Mix Dry Ingredients In a medium bowl, whisk together the flour, cocoa powder, baking powder, and salt until thoroughly combined and no lumps remain. This ensures even distribution of the leavening agent and cocoa throughout your cookies.
3. Cream Butter and Sugar In a large mixing bowl, beat the softened butter and granulated sugar together using an electric mixer on medium speed for 2 to 3 minutes. The mixture should become light, fluffy, and pale in color. This incorporates air for a tender cookie texture.
4. Add Eggs and Coloring Add the eggs one at a time, beating well after each addition until fully incorporated. Stir in the vanilla extract and red food coloring, mixing until the batter is evenly tinted with that beautiful red velvet hue. Don’t be shy with the food coloring—you want a vibrant red!
5. Combine Mixtures Gradually add the dry ingredient mixture to the wet ingredients, stirring gently with a spatula or wooden spoon just until no streaks of flour remain. The dough will be soft, slightly sticky, and deeply colored. Avoid overmixing to keep your cookies tender.
6. Chill the Dough Cover the bowl with plastic wrap and refrigerate for at least 30 minutes. This crucial step firms up the dough, making it much easier to handle and shape. Chilled dough also helps the cookies maintain their shape and develop those gorgeous cracks during baking.
7. Form and Coat Dough Balls Once the dough is chilled and firm, scoop out tablespoon-sized portions (about 1 to 1.5 tablespoons each). Roll them between your palms to form smooth 1-inch balls. Roll each ball generously in powdered sugar until completely coated—don’t be stingy with the sugar, as this creates the dramatic crinkle effect.
8. Bake Place the sugar-coated dough balls on your prepared baking sheets, spacing them about 2 inches apart to allow for spreading. Bake for 10 to 12 minutes, or until the cookies are set around the edges but still appear soft in the center. They’ll look slightly underdone—that’s exactly what you want for soft, chewy cookies.
9. Cool Let the cookies rest on the baking sheets for 3 to 5 minutes to finish setting. They’ll be very delicate right out of the oven. Then carefully transfer them to a wire cooling rack to cool completely. The crinkle pattern will become more pronounced as they cool.
Serving Suggestions
- Holiday Cookie Platter: Arrange these alongside sugar cookies, gingerbread, and chocolate chip cookies for a colorful, varied dessert spread
- Gift Box Star: Package in clear cellophane bags tied with festive ribbon for beautiful homemade gifts that impress
- Hot Beverage Pairing: Serve warm with hot chocolate, peppermint mochas, or eggnog for the ultimate winter comfort treat
- Ice Cream Sandwich: Use two cookies to sandwich vanilla or cream cheese ice cream for an elevated dessert
- Dessert Table Centerpiece: Stack on a tiered stand as a striking focal point at holiday parties or weddings
Storage & Make-Ahead Tips
Room Temperature Storage: Store cooled cookies in an airtight container at room temperature for up to 5 days. Place parchment paper between layers to prevent them from sticking together and to preserve the powdered sugar coating.
Freezing Baked Cookies: These cookies freeze beautifully! Place cooled cookies in a single layer on a baking sheet and freeze until solid (about 1 hour), then transfer to a freezer-safe container or bag. Freeze for up to 3 months. Thaw at room temperature for 30 minutes before serving.
Freezing Cookie Dough: You can freeze the dough balls before coating them in powdered sugar. Shape the chilled dough into balls, freeze on a baking sheet, then transfer to a freezer bag. When ready to bake, roll frozen dough balls in powdered sugar and add 1-2 extra minutes to the baking time.
Make-Ahead Instructions: Prepare the dough up to 2 days in advance and keep it covered in the refrigerator. Let it sit at room temperature for 10-15 minutes before scooping and rolling if it becomes too firm. The powdered sugar coating is best applied just before baking for the most dramatic crinkle effect.
Refreshing Tip: If the powdered sugar coating dulls after storage, you can lightly dust the cookies with additional powdered sugar before serving to restore that snowy appearance.
Tips & Tricks
Chill the Dough Fully: Don’t skip or shortcut the chilling time. Properly chilled dough is essential for cookies that hold their shape and develop those beautiful, deep cracks. If you’re in a hurry, you can chill for 15 minutes in the freezer instead of 30 minutes in the refrigerator.
Use Gel Food Coloring: Gel or paste food coloring produces more vibrant red color without adding excess liquid to your dough. Liquid food coloring works but may require more volume and can affect dough consistency. Start with 1 tablespoon and add more if needed for your desired intensity.
Don’t Overbake: These cookies should look slightly underdone when you remove them from the oven. They’ll continue to set as they cool on the baking sheet. Overbaking results in dry, cakey cookies instead of the desired soft and chewy texture.
Common Mistakes to Avoid
- Skipping the chill time – Warm dough will spread too much during baking and won’t develop proper cracks in the powdered sugar coating
- Rolling dough balls unevenly – Inconsistent sizes lead to uneven baking; some cookies will be overdone while others are underdone
- Not coating thoroughly in powdered sugar – A generous coating is essential for that dramatic crinkle effect; skimpy coating = minimal cracks
- Using softened butter that’s too warm – Butter should be room temperature but still hold its shape; melted or very soft butter creates greasy, flat cookies
- Placing cookies too close together – These spread during baking and need adequate space, or they’ll merge into one giant cookie
Chef’s Advice
Flavor Variations:
- Add ½ teaspoon almond extract along with the vanilla for a more complex flavor profile reminiscent of traditional red velvet cake
- Mix in ⅓ cup white chocolate chips to the dough for pockets of creamy sweetness
- Add 1 teaspoon espresso powder to intensify the chocolate flavor without making it taste like coffee
- Fold in ½ cup cream cheese chips for an authentic red velvet cake experience
Ingredient Substitutions:
- Salted butter can replace unsalted butter—just omit the added salt from the recipe
- All-purpose gluten-free flour blend (1:1 ratio) works well for a gluten-free version
- Coconut oil can substitute for butter, though it will slightly alter the flavor and texture
- Natural red food coloring from beet powder can replace artificial coloring, though the color will be less vibrant
Presentation Ideas:
- Drizzle cooled cookies with melted white chocolate for extra elegance
- Press a few white chocolate chips into the tops before baking for added texture
- Dust with edible pearl dust or disco dust for a glamorous, sparkly finish
- Sandwich two cookies with cream cheese frosting for red velvet whoopie pies
- Arrange in a decorative tin with tissue paper for beautiful holiday gifting
Color Customization: These cookies can be made in any color for different occasions—pink for Valentine’s Day, green for St. Patrick’s Day, blue for baby showers, or purple for birthdays. Simply swap the red food coloring for your desired shade.
History and Cultural Significance
Red velvet desserts have a rich and somewhat mysterious history that dates back to the Victorian era. The term “velvet” was originally used to describe cakes with exceptionally fine, soft crumbs achieved through specific ingredient combinations. The distinctive red color likely originated from a natural chemical reaction between acidic ingredients (buttermilk or vinegar) and non-alkalized cocoa powder, which produced a reddish-brown hue.
During the Great Depression, red velvet cake gained popularity when the Adams Extract Company began marketing red food coloring and butter vanilla flavoring specifically for the cake, distributing recipe cards to spread awareness. The cake’s luxurious appearance made it feel special during economically challenging times.
Crinkle cookies, on the other hand, have been a American holiday tradition since at least the 1950s, with chocolate crinkles being the most iconic version. The distinctive cracked appearance earned them the nickname “earthquake cookies” in some regions. The dramatic visual contrast between the dark interior and powdered sugar exterior made them particularly appealing for festive occasions.
Red Velvet Crinkle Cookies represent a modern fusion of these two beloved traditions, combining the sophisticated flavor profile of red velvet with the playful, festive appearance of crinkle cookies. They’ve become increasingly popular on social media platforms like Pinterest and Instagram, where their photogenic qualities make them ideal for holiday baking content.
Final Thoughts
These Red Velvet Crinkle Cookies are proof that sometimes the most impressive treats are also the easiest to make. With their stunning appearance and irresistible soft, chewy texture, they’re guaranteed to become a holiday favorite in your household. The combination of subtle chocolate flavor, beautiful color, and that dramatic powdered sugar crackle makes them perfect for any festive occasion.
Whether you’re an experienced baker or just starting out, this recipe is wonderfully forgiving and consistently delivers beautiful results. The dough comes together quickly, and the most challenging part is simply waiting for it to chill. Make a double batch—these disappear quickly, and everyone will be asking for seconds.
So gather your ingredients, turn on some holiday music, and get ready to create cookies that are as delightful to look at as they are to eat. Your kitchen will smell amazing, and you’ll have a platter of gorgeous, professional-looking cookies that’ll be the star of any celebration. Happy baking!
Nutrition Information
| Serving Size | Calories | Protein | Carbs | Fat | Fiber | Sugar |
|---|---|---|---|---|---|---|
| 1 cookie (based on 24 cookies) | 95 | 1g | 15g | 4g | 0.5g | 10g |
Disclaimer: Nutrition information is estimated using standard online calculation tools and may vary based on ingredients and preparation methods. For accurate dietary advice, consult a qualified nutrition professional.
Yield: Approximately 24-30 cookies | Servings: 24-30