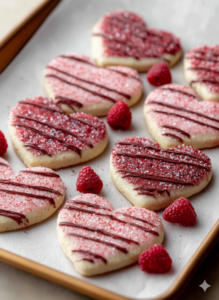
These Strawberry Kiss Cookies combine buttery, melt-in-your-mouth dough with the sweetness of strawberry and a classic chocolate kiss center.1 I first discovered this recipe when I needed something vibrant and festive for a spring bake sale, and they were the star of the show! A light dusting of powdered sugar adds the perfect finishing touch to these bright pink delights. They are the perfect blend of fruity and rich, making them a total crowd-pleaser for Valentine’s Day, baby showers, or just a cozy afternoon treat.
")
Prep Time: 20 min | Cook Time: 12 min | Total Time: 1 hour 32 min
Key Ingredients
- 1 cup Unsalted Butter: Softened to room temperature for a smooth, creamy dough.
- 1 cup Granulated Sugar: Provides sweetness and a tender crumb.2
- 1 Large Egg: Ensure it is at room temperature for better emulsion.
- 1 tsp Vanilla Extract: Enhances the overall flavor profile.
- 1/2 tsp Almond Extract (Optional): Highly recommended to make the strawberry flavor “pop.”
- 2 cups + 2 tbsp All-Purpose Flour: The base of our cookie structure.
- 1 tsp Baking Powder & 1/4 tsp Salt: For lift and flavor balance.
- 1 package (3 oz) Strawberry Gelatin Mix: Gives the cookies their iconic color and fruity taste.
- 24-30 Chocolate Kiss Candies: The perfect chocolatey center.
- 1/4 cup Powdered Sugar: For a beautiful, snowy finish.
Step-by-Step Instructions
- Cream the Butter and Sugar: In a large mixing bowl, beat the softened butter and granulated sugar until light and fluffy (about 2-3 minutes).
- Add Wet Ingredients: Mix in the egg, vanilla extract, and almond extract. Once combined, add the strawberry gelatin powder and beat until the color is vibrant and even.
- Mix Dry Ingredients: In a separate bowl, whisk together the flour, baking powder, and salt. Gradually add this to the pink wet mixture, mixing on low speed until a soft dough forms.
- Shape and Chill: Roll tablespoons of dough into smooth 1-inch balls. Place them on a baking sheet and chill in the refrigerator for at least 1 hour. This is the most important step to prevent flat cookies!
- Bake: Preheat your oven to 350°F (175°C). Arrange the chilled balls on a parchment-lined sheet, 2 inches apart. Bake for 11-13 minutes until the edges are set and firm.
- Dust with Sugar: For the cleanest look, dust the warm cookies with powdered sugar immediately after taking them out of the oven.
- Add the Kisses: Let the cookies sit for 2 minutes, then gently press a chocolate kiss into the center of each.
- Set and Cool: Transfer to a wire rack and allow the chocolate to firm up and the cookies to cool completely.
Serving Suggestions
- Valentine’s Day Spread: Arrange them on a platter with fresh strawberries and dark chocolate pieces.
- Tea Time: Serve with a hot cup of chamomile or a glass of cold strawberry milk.
- Gift Tins: Layer these in a tin with parchment paper between layers for a thoughtful homemade gift.
- Ice Cream Side: Serve a warm cookie alongside a scoop of vanilla bean ice cream.
Storage & Make-Ahead Tips
- Refrigeration: Store in an airtight container at room temperature for up to 5 days.
- Freezing: You can freeze the baked cookies for up to 3 months.3 Thaw at room temperature.
- Make-Ahead: You can prep the dough balls up to 24 hours in advance and keep them in the fridge until you are ready to bake.
Tips & Tricks
- Prevent Spreading: If you find your cookies are still spreading too much, try chilling the dough balls overnight instead of just one hour.
- The “Clean” Dusting: Always dust with powdered sugar before you put the chocolate kiss on. This keeps the chocolate looking dark and shiny rather than covered in sugar.
- Uniform Size: Use a small cookie scoop to ensure all your “snowballs” are the exact same size for even baking.
Common Mistakes to Avoid
- Skipping the Chill: If the dough is too warm when it hits the oven, the cookies will melt into flat puddles rather than staying thick and soft.
- Indenting Before Baking: Do not press a hole for the kiss before baking. The cookies should be baked as round balls to maintain their shape.
Chef’s Advice
- Flavor Variations: Try using Raspberry or Cherry gelatin for a different fruity twist!
- Ingredient Substitutions: If you want an even brighter pink, add 1-2 drops of pink gel food coloring to the wet ingredients.
- Presentation Idea: If the cookies come out a little flat, use a spoon to gently push the edges inward while they are still hot to reshape them into perfect circles.
History and Cultural Significance
The “Kiss Cookie” design is a beloved American classic that rose to fame in the mid-20th century, traditionally made with peanut butter. This strawberry version is a modern evolution, using gelatin to add flavor and color, making it a popular choice for springtime celebrations and “pink-themed” parties across the United States.
Final Thoughts
These Strawberry Kiss Cookies are as delightful to look at as they are to eat. The combination of fruity dough and rich chocolate is a match made in heaven. Give this recipe a try for your next gathering, and watch them disappear!
Nutrition Information Table + Disclaimer
| Serving Size | Calories | Protein | Carbs | Fat | Fiber | Sugar |
| 1 cookie | 165 | 2g | 22g | 8g | 1g | 14g |
Disclaimer: Nutrition information is estimated using standard online calculation tools and may vary based on ingredients and preparation methods. For accurate dietary advice, consult a qualified nutrition professional.